This post may contain affiliate links.
If you’ve never tried plastic canvas before, it is one of the easiest, most beginner-friendly, and cost-effective crafts! You don’t need experience with any other kinds of needlecrafts to get started, and the tools you need are super minimal and inexpensive. In fact, there aren’t even *elevated* versions of what you need that could possibly get you in the trap of buying all of the “best” tools and then discovering that you’re not into the craft in the end. I see you, and I know that you have several boxes of abandoned passion projects in your closet.
The Tools
The first thing you’ll need is plastic canvas. That’s the name of the craft, but it’s also the name of the thing you use to create your projects. It’s a thin, flexible sheet of plastic with holes in it, and you run yarn through those holes to make a picture. You can also use it to create 3D structures, which makes this a very versatile medium. You can make magnets and ornaments and wall hangings, but you can also make boxes and purses and bracelets.
Plastic canvas comes in sheets that need to be cut down to size based on the pattern you’re working on. There are a few standard sizes. 7-mesh is the one I use the most often and is always readily available at craft stores. “7-mesh” refers to the amount of holes per inch in the plastic canvas.
You’ll need yarn for your projects, and the fun thing about plastic canvas is that you can use the cheapest yarn available: 100% worsted weight acrylic. It comes in a ton of colors and you can get it at any craft store (and a lot of times at thrift stores). If you haven’t worked with yarn before, “worsted weight” (or “Aran weight” in the UK) just means that it’s a standard weight – not thin and not bulky. You’ll look for a little symbol on the back of the yarn label that says “4” to be sure that you’re using the right size. My patterns will always give the brand and color I used, but feel free to use whatever you find that is closest to the color, or use your imagination to make something truly unique.
Next you’ll need a needle. You’ll want something with a big eye (that’s the hole the yarn goes through) and a blunt end (you don’t have to pierce through fabric, so this needle will feel more like a knitting needle than a sharp sewing needle). What you’re looking for is often called a “yarn needle” or “tapestry needle” and you’ll want it in a size 16 or 18. They come in plastic or metal. I always use a size 16 in metal. That’s my preference, and you can decide what works best for you! 16s are a little smaller and easier for me to handle, and I’ve broken a lot of plastic needles so the metal ones are a little more cost-effective for me, ha!
The last thing you’ll need is a pair of scissors! Plastic canvas cuts super easily with a pair of regular old craft scissors. You don’t need anything fancy here, and please don’t use anything fancier on it like fabric shears or a really sharp pair of specialty paper scissors. For the smaller sections of canvas that you’ll need to cut out, you might want to pick up a pair of flush cut jewelry wire cutters, and to make cutting your yarn go more smoothly, you may want a pair of embroidery scissors. These two are totally optional, though! You don’t need them to get started on your first project.
Let’s Get Going!
If you prefer to watch someone work, you’re in luck! I have a video tutorial on the basics you’ll need to get started on a plastic canvas project here!
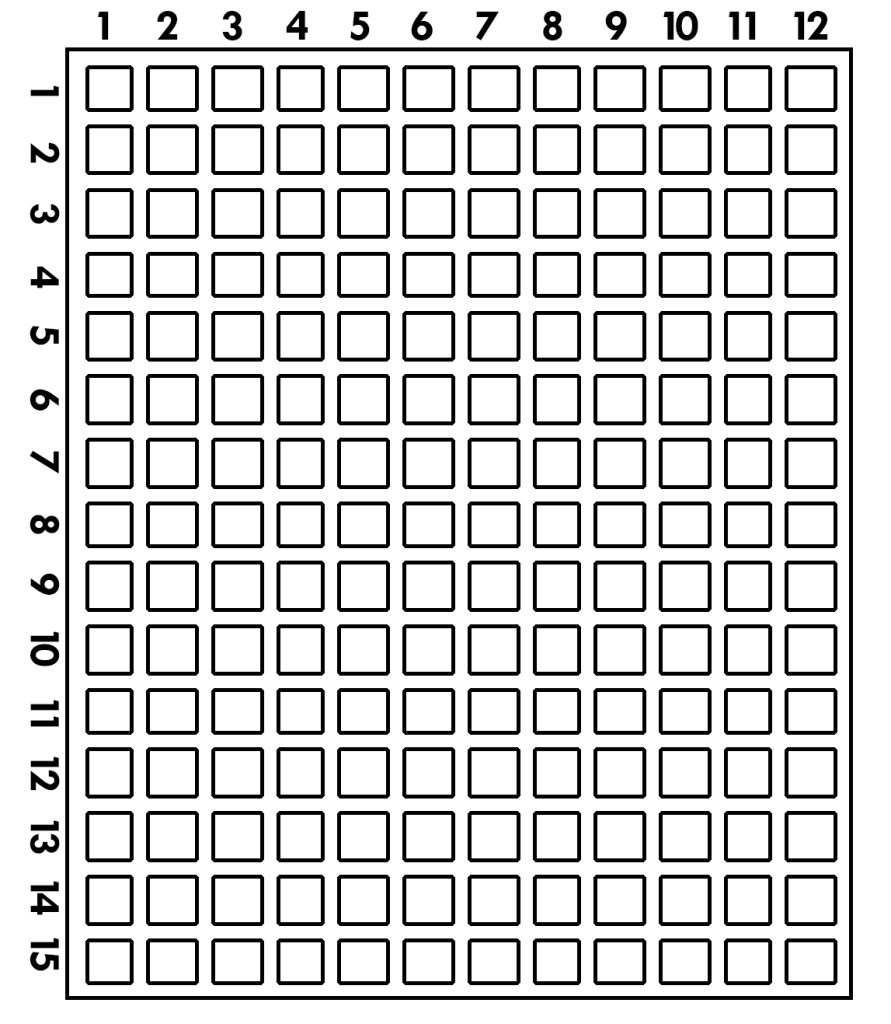
Otherwise, read on! To start, you’ll need to cut your plastic canvas pieces to size. When you look at your pattern, it will give you guidance on how large the pieces need to be cut. Let’s say it’s asking for a piece that is 12×15. Well, you’ll count the HOLES in the canvas to determine how big that piece should really be.
Now you’ll need to make your first cut. Look at the plastic bars between the holes – those are called the threads. You’ll want to cut to the outside of the hole, along the side of the thread.

In this example, we needed seven holes, so we ran the scissors to the outside of that seventh hole.
When you’re starting a length of yarn – which you should cut to about one yard/one meter – you’ll want to catch the tail end of the yarn under your first stitches

Hold the tail end on the back of the canvas with your non-dominant hand and then trap it with the back side of the stitches that you make. This will keep the stitches from unravelling without having to use knots.
When you’re done with a length of yarn (because you’ve run out, or because you’re finishing a section, or you’re switching colors), you run the tail end of the yarn under some stitches you’ve already made.
Turn your canvas over and run the needle under three or four stitches, clipping the yarn at that point. Again, these stitches won’t unravel and you won’t need a knot to keep them in place.
Stitches You’ll Need to Know
There are a lot of stitches that you can do in plastic canvas that come out with interesting effects, but the basics are all you really need to get started.
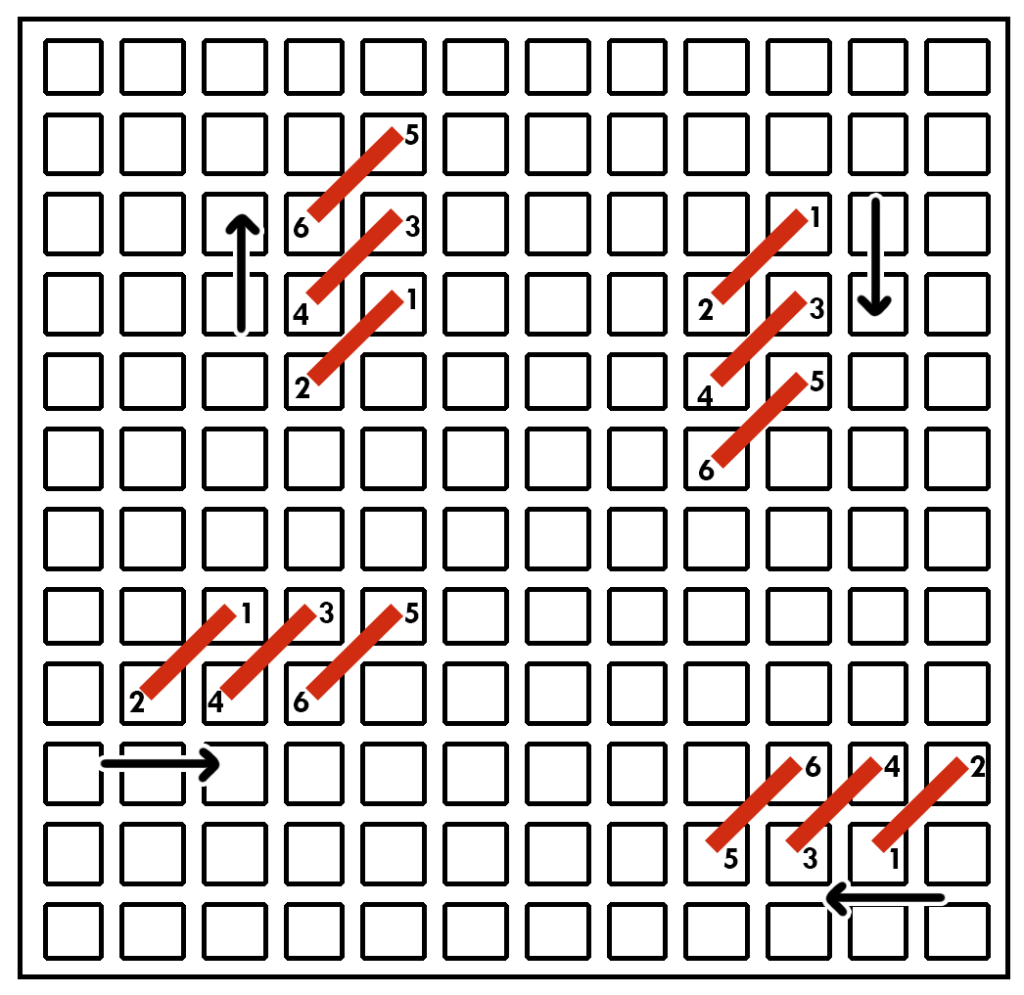
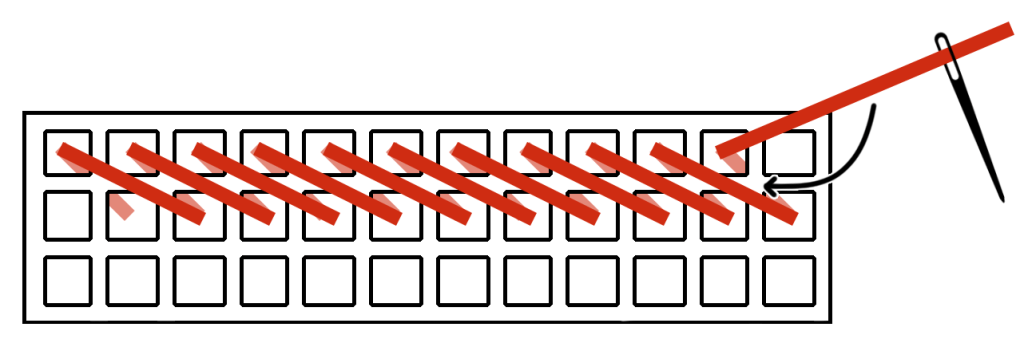
A Half Stitch is short, 45-degree angle stitch. The direction of the row you’re working with (left-to-right, bottom-to-top, etc.) will determine how you form your stitches. If you follow the pattern here, you’ll come UP through the canvas on the odd-numbered spaces, and DOWN through the canvas on the even-numbered spaces. So up through the 1, down through the 2, up through the 3, down through the 4, etc.

From left to right, these stitches are Scotch Stitch, Straight Stitch, Backstitch, and Long Stitch. The patterns are followed in the same way as the half stitch. Come up at the odd-numbered spaces, and go down through the even-numbered spaces.
Scotch Stitch and Straight Stitch are often used to fill in larger sections of the canvas, or to make different textures. Backstitch and Long Stitch are used for detail work, like outlining an area around a window or creating the stems for flowers. You’ll often see these stitches in a different color than the base and they’ll be stitched last, over the other stitches you’ve already made in that area.

The Whip Stitch is used for joining pieces of plastic canvas together. You’ll need to do this if you’re creating any kind of 3D structure, like a tissue box. You’re essentially doing a half stitch, but over two pieces of canvas. Just like with the other patterns above, you’ll follow the numbers, coming up at odd numbers and going down at even numbers. You’ll notice that the first stitch and the last stitch are horizontal. The reason for this is to create a nicer finish and a little more security at those ends.
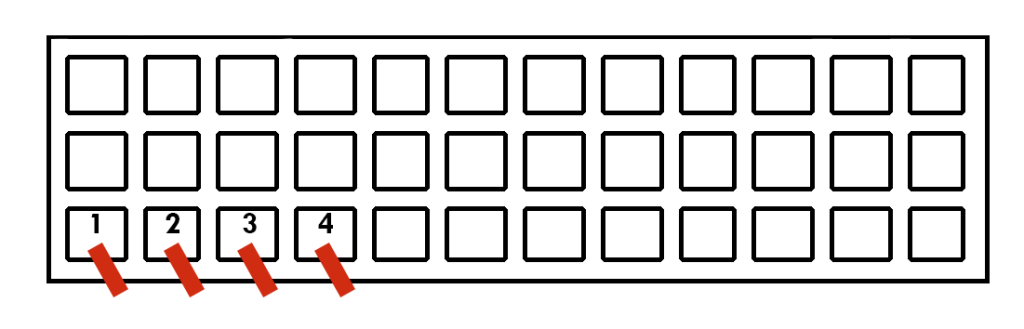
The final stitch you’ll need in your beginner’s arsenal is the Overcast Stitch. This one is used no matter what type of project you’re working on (3D or 2D), and it covers over the exposed plastic edges of the canvas to give a lovely finished edge. This is the only pattern that differs from the rest, because you don’t ever go down through the canvas, you only come UP. So, come up at the 1, hold your yarn out the way and bring your needle around to the back, and then come up again at the 2. Keep going until your plastic edge is covered. When you get to the corners, you can come up several times through the corner hole in order to get all of the plastic covered over.
Wow, That Seems Easy!
I hope that’s what you’re thinking right now, anyway! Again, give the video a watch if you’re feeling like you need to see it in real time. All of my patterns will contain a simplified version of these instructions, and you can come back to this page, the video, or download a handy PDF of these instructions anytime you need a refresher!


Leave a comment